Local is lekker
I think I need to give a bit of my background in how
I came to be touched by such an “obscure calibre” as the 6.5X68.
My father owned Rosenthal’s
Gun shop until retirement in 1973. So I grew up with the smell of Balistol in
my nose and an early hearing problem. My father more than enjoyed his years in
the firearm trade and this enthusiasm rubbed off on me. I spent many afternoons
reading Firearms literature and spent the weekends on the farms of family &
friend’s. In the late 80’s I decided to experience the world and started
travelling. My shooting experiences downscaled tremendously. I made up
for that when I returned home for a break, from leading the strenuous life of
being a professional “gentleman of the road”.
My father had a
set of 2 custom rifles made up on M98 actions by the Triebel brothers.
The one was a 8x68 and the other an 6.5X68.
When he asked me if I wanted these, I declined on the 8X68, as the recoil was
too much for my liking. I experimented with the 6.5X68, but could not get it to
group, so I declined that also. I only keep items that work, as I expect them to !
Of course today I am biting my behind for being such an ass at the time.
Before extolling
on the virtues of the 6.5X68, I would like to point out that I have been on the
pursuit of accuracy for a long time.
My observation is that few people are really interested in shooting extremely
accurately & shooting an accurate rifle. I would also guess that far less
than that can shoot under 1 minute of angle regularly. That would be on the
range. Inside the local publican things are mightily different.
About 10 years ago I started dealing with Gerard Schultz from GS custom for my bullet needs. I find his HV range of bullets exceptional game killers. Sometime back in 2008 Gerard got me interested in the .22-06, as he had built rifles in this calibre for his daughters. Putting meat in the freezer shot with a 40 gr pill @ 4700 fps sounded mighty tempting. In the end I decided to pass this for the time being, as the game accessible to me is in the Oryx, Kudu range. During our discussions he mentioned the 6.5X68 as a possible project. I think it took me less than 24 hours to get hooked on the idea.
Now here comes
the twist. Instead of going with a Remington 700 long action and a Shilen
barrel with a Boyd stock &&&
I decided to use local components and craftsmanship as much as possible.
The idea was probably triggered by my having a used Musgrave 80 Action in my
possession.
So first I contacted Truvello for a barrel. It was decided to go for a 1:7.87”
twist in a barrel, as that was the tightest they had. In the end this
proved to be a bad call on my side. The contour was to be similar to that of
the old Mausers. I had gotten a profile drawing from Gerard, which we used in
28” length. Further spec’s were that I wanted the
chamber 2mm longer, so I could cut it down to size.
Also I asked Truvello to make the chamber as tight as possible toward the
bottom of the spec if not under spec- asking them to possibly use an older
reamer.
In 2005 Truvello quoted me R 1110 for a barrel shipped directly to me. When I
had finally gotten things rolling in mid 2009, I had to pay their local agents
in Windhoek R 4500 for the same item !
On a business
trip to Joburg I had Armtec measure me up, to make a custom thumbhole stock for
me. This was also the first item to arrive by post.
Getting a license for the barrel proved to be another issue…
In the meantime I got a modified RSA action from a 30-06, which I was advised
to use.
Finally it all came together
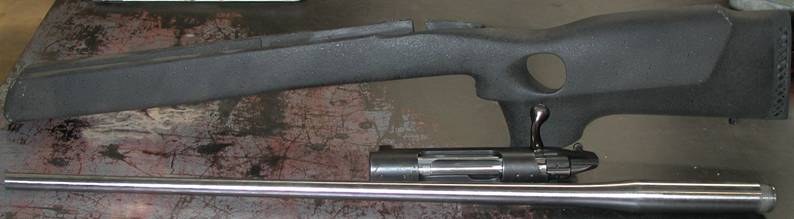 I commissioned the respected gunsmith Edmund Gall to
put it all together for me.
I commissioned the respected gunsmith Edmund Gall to
put it all together for me.
Initial testing
at the range showed reasonable accuracy, but nothing to get excited about:
GS
95HV
70gr S385
3760
GS
95HV
67gr
S365
3846
GS
110SP
67gr
S385
3573
GS
110SP
63.5
S365
3569
Nosler
140
63.7
S385
3229
The above are all maximum loads generated on the bench over a Chrony !
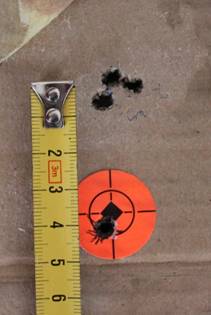
Meticulous
record keeping is a must when doing load development
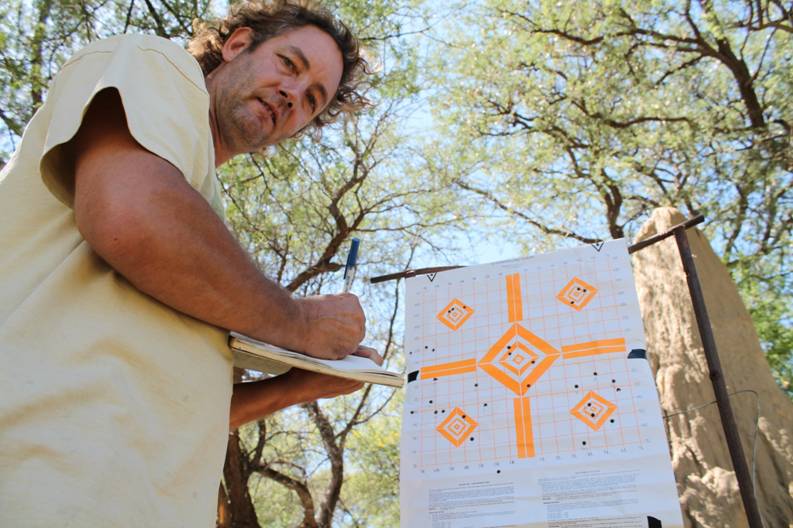
Seeing this target some time down the line, does not tell me how that top left grouping developed out of this “mess” of holes.
Measuring and
re-measuring parameters and items are part of development.

Then it bit me
twice. Firstly I had some of the 140gr Nosler Custom Competition bullets disintegrate
about 50m after exiting the barrel. Quite spectacular I was told.
This I presumed to be a result of too thin a jacket coupled with a too tight a
twist. Since velocity obviously played a role, I then reduced my s385 loads to
56.5gr giving me 2887 fps.
One day I was walking toward the target on the shooting range. Volker had built
his farm, when I noticed a piece of tin shining on the ground.
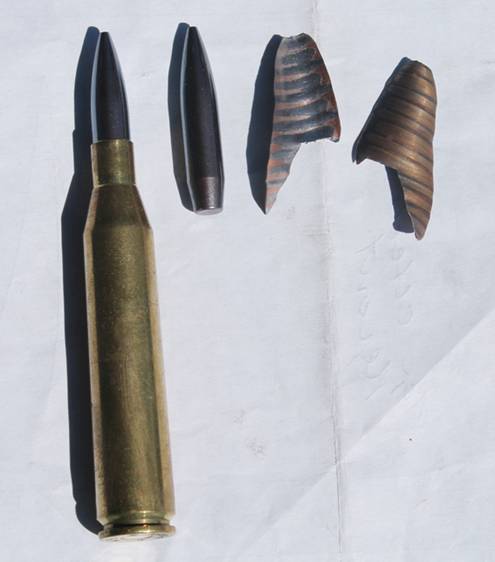
Very impressive to see how this jacket had come off the bullet
!
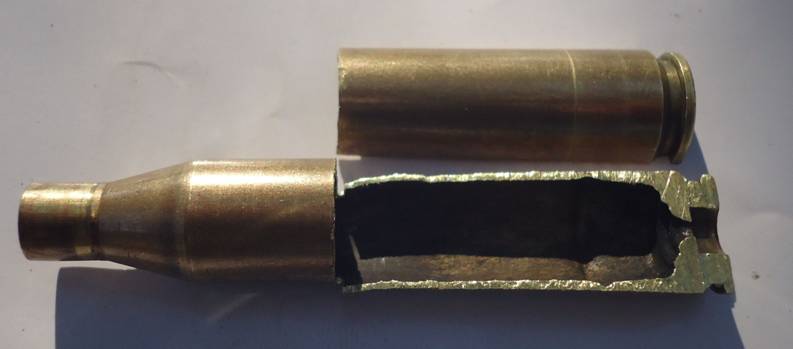
The 2’nd was
noticing a thin ring on a case near the base and upon further inspection-
impeding case head separation
So far I had
been using once fired 6.5X68 cases. But then I received a whole bunch of 8X68
cases, that had been picked up from the back of a farmers bakkie, that I decided to prepare as following, after annealing the
necks:
Weighing them showed up to 30gr difference, giving a 80 fps difference with the
140gr custom competition bullets, with amazingly little difference in drop or
grouping at 100m.
I then decided to neck them down using a Redding S-type die starting with
an outside neck of 9.22 mm & running that through a 335 Nitride Bushing and
then a 296 Nitride bushing to get a outside neck of 7.48 not utilizing the
decap rod & plug. Finally I ran it through a full-length Simplex die
with a decapping pin and expander plug, to fit the chamber easily. Outside neck
Diameter then measured 7.50 mm and once I seated the 140 Nosler Custom
competition bullets it became 7.55 mm. The beauty is, that the fired case
outside-neck measures 7.60 mm !
I then fire formed all cases during practice &
competition, doing well enough to be happy with my project rifle.
Of course some fliers made me realise a lot more work was to be done.
This took about a weekend to prepare 50 Hirtenberg and 150 RWS cases, which had now been fire formed in my rifle. In essence boring work, but worth it.
As usual I punch out
the primer (with a dedicated tool) and clean the pocket with one of Chris van
Niekerk tools.
Immediately resizing the first 6mm of the neck with a Redding
type-S die by turning the die ½ turn out.
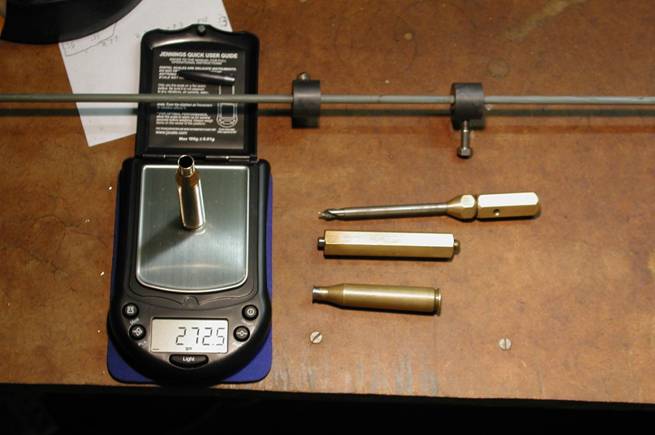
Some of the tools used to uniform the cases:
On top the Ramrod has movable stops on it to calculate COL.
Next is a inside flash hole de-burrer or cutter. Note that I do not drill the flash-hole
bigger with this, but do this separately when necessary.
Followed by a primer pocket uniformer
Lastly a home made case-length gauge which is used to
determine the next step.
Making sure all the cases are the same length is important. For safety sake one
has to keep the neck a safe distance from the lands and at the same time long
enough to grip the shank of the bullets securely. Also it squares off the case
mouth.

The tool at the right rear is used for de-burring the outside & inside of the case mouth, after trimming.
The next step is to cut the outside neck leading to
a nice uniform chamfer around the shoulder neck junction, in order to ward off
the development of a donut (left case)...
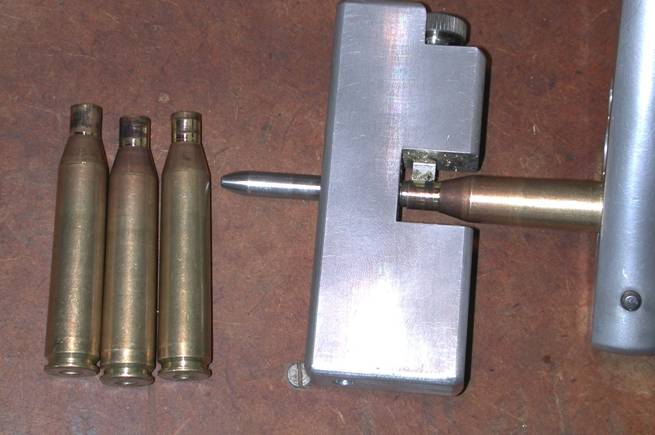
The next step involved kissing the outside of the neck slightly with a outside neck cutter, running it into the shoulder in order to get uniformity and I then turned the blade down a bit further & setting the mandrill stop slightly further out to cut at least one ½ of the neck (centre case) or even the whole neck in order to get concentricity and batch conformity.
I then go to my shop’s work-bench, where I drill the
flash hole to 1.9 dia. This is Necessary on these RWS cases as they seem to
have varying flash holes starting from as small as 1.4mm…
The final step is to cut the inside of the flash-hole with the tool shown...
Occasionally I
test with a 6.5mm inside neck cutter, if any case has a donut or other
restriction.
Then I tumble the cases for the final clean up
Personally I find it less tiring & monotonous to
prepare these large volumes of cases in batches of 50 or so.
Whilst preparing one batch of cases, I let another lot tumble. Also tumbling
smaller amounts of brass seems to clean up quicker, which causes less damage to
the case-mouths.
The main thing is to make sure all cases are treated the same; uniformity is
the key word here.
After the tumbling I polish the case mouth with this home-made tool that is
inserted in a stationary drill, such as a press or lathe.
Sometimes (especially on soiled brass) I tend to wash the cases in sunlight or in tartaric acid.
The next day, when the cases are dried properly, I
weigh & sort them from lightest to heaviest.

I use a Lee hand primer, as that seems to give me a better feel for proper
seating.
After experimenting with different primers, seating depths & pressures as
well as flash-hole preparations & size, I am sure that this is the backbone
to accuracy in the cartridge. This was again confirmed by this project, as well
as many others.
But is all this
preparation not going over board ?
I think a little neck turning & sorting of cases may help at long ranges,
such as encountered at Bisley shoots, but maybe not..
Latest
heavy gun benchrest record in the US of A, was with a 300 Weatherby using all
new cases at their first firing !
Something like 3 inches with a 10 shot group, performed by Ken
Brucklacher.
I tune my rifle,
case, bullet combo in the following manner.
Starting by sourcing empirical data for maximum velocity/charge and if that
fails I use a internal ballistic program, such as
Quickload.
I try never go below a 80% case volume/powder charge,
if possible.
I make sure that my initial load is identical in 3 cases, which may not show
any signs of pressure after firing.
I chronograph every shot, as those figures can tell you more than sticky case
or flat primers.
Keeping meticulous records help tremendously and are invaluable as memory
fades.
The rest is easy, as I load up cases by ½ grain of powder until I get my
required velocity or until there is a hint of pressure.
Then I back off about 1 grain and try find optimal
seating depth using 3-shot batches/groups. Starting with the bullet just off
the rifling and going back by 1/2mm per batch.
Although I shoot for grouping, I still Chrony the results. I try do this early in the morning when there is no wind &
mirage.
When I find the sweet spot, I have to decide whether to leave good enough alone
or in case of a precision rifle do some more testing.
In the latter case I might have to adjust my powder charge slightly and then
test 5-shot groups with slightly different seating depth.
Seating depth is what determines group size in the end.
I find that cleaning my rifles immediately after
shooting makes things far easier:
After firing about 800 rounds my throat had eroded
2mm.
This prompted me to re-develop some loads.
Strangely enough this difference in seating depth did not make a huge
difference.
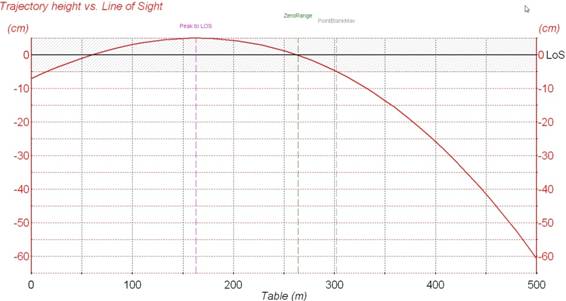
I use the GS Custom 264095HV134for hunting, as it gives me good
groups
And a nice flat trajectory
Thanks go to:
Gerard Schultz for sowing the seed
Chris van Niekerk in supplying Case preparation tools
Dave Dibble from Redding in assisting me toward choosing the right tools for
the job
Edmund Gall for putting all together
Robert Lottering for the countless hours spent on the range fine-tuning this
kirrie
Volker for setting up the range for me